Main Courses
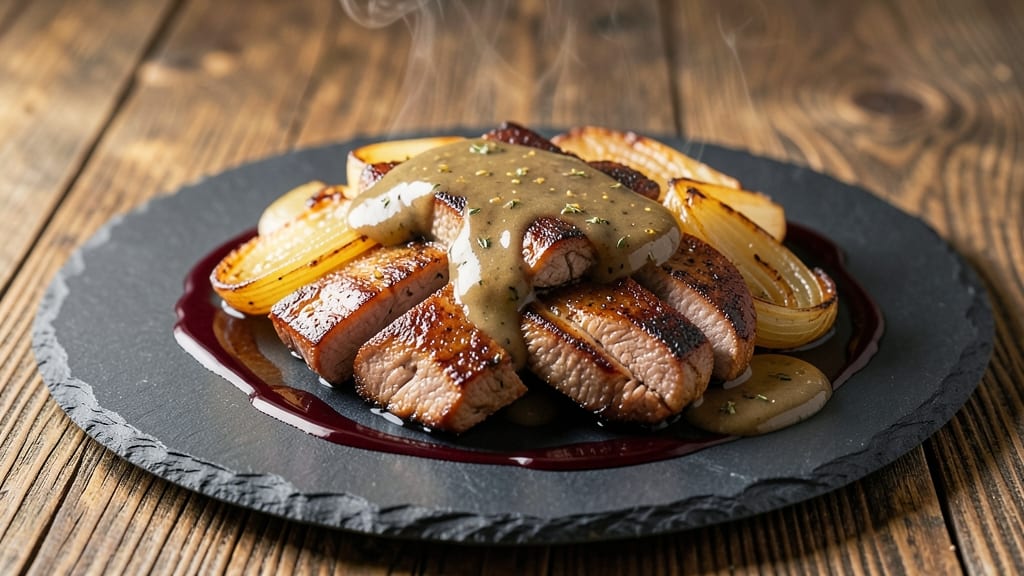
This baked liver and onions with gravy recipe delivers the perfect balance of crispy caramelized onions and tender liver, all topped with a velvety pan sauce that transforms a simple weeknight meal into something restaurant-worthy.
The secret lies in precise baking temperatures and a methodical approach to developing that rich gravy from the pan drippings—no shortcuts here, just professional results that impress even skeptical guests.
What sets this recipe apart is the crispy top on the onions, achieved through careful layering and baking time, while the liver remains juicy and flavorful.
The gravy, made directly from the pan juices, captures all the deep, savory notes of the liver and caramelized onions, creating a sauce that's both rich and balanced. This isn't your grandmother's liver and onions—it's a refined, foolproof method that elevates the dish to new heights.
The process is straightforward but requires attention to detail, particularly when baking the liver and onions at the right temperature to ensure the onions caramelize while the liver stays tender.
The gravy, thickened just enough to coat the back of a spoon, ties everything together with its complex, umami-rich flavor profile. Once you try this version, you'll never settle for anything less.
Perfect for a hearty Sunday supper or a special dinner, this recipe serves four and comes together in about one hour, including prep and baking time. The leftovers reheat beautifully, making it an excellent meal prep option for busy weeks. Let's get started on creating this crispy-topped, gravy-drenched masterpiece.
Ingredients for baked liver and onions with gravy
Twelve precise ingredients transform simple liver and onions into a restaurant-worthy masterpiece.
| Ingredient | Amount | Notes |
|---|---|---|
| Calves' Liver 🥩 | 1 lb | Fresh, trimmed of connective tissue |
| Yellow Onions 🧅 | 2 large | Thinly sliced, yellow variety preferred |
| Unsalted Butter 🧈 | 6 tbsp | Cold, cut into pats for layering |
| All-Purpose Flour 🌾 | 2 tbsp | For gravy thickening |
| Beef Stock 💧 | 1 cup | High-quality, homemade preferred |
| Dry Red Wine 🍷 | ¼ cup | Bold Cabernet Sauvignon recommended |
| Fresh Thyme 🌿 | 1 tbsp | Leaves only, finely chopped |
| Fresh Parsley 🌿 | 2 tbsp | Chopped, for garnish |
| Diamond Crystal Kosher Salt 🧂 | 1 tsp | For seasoning and gravy |
| Freshly Ground Black Pepper 🌶️ | ½ tsp | Cracked peppercorns preferred |
| Heavy Cream 🥛 | ¼ cup | Full-fat for rich gravy |
| Balsamic Vinegar 🍶 | 1 tsp | For gravy depth |
The calves' liver must be freshly sourced—ask your butcher for the thickest cut possible to ensure even cooking. Whole Foods or local butcher shops typically carry the best quality, often labeled as 'foie gras' or 'calves' liver'. Look for vibrant, deep red color with minimal bruising. The onions are the backbone of texture—yellow onions provide the perfect balance of sweetness and sharpness when caramelized. For the butter, European-style unsalted (like Plugrá or Kerrygold) creates a richer flavor profile than standard American brands. Prep the liver last to prevent oxidation—it cooks faster than you might expect.
No beef stock? Homemade chicken stock works in a pinch, though the umami depth will be slightly reduced. Substitute the red wine with equal parts beef broth and a splash of balsamic vinegar—the acidity helps balance the richness. Fresh thyme is ideal, but dried thyme at one-third the amount suffices if needed. For the onions, red onions can replace yellow for a milder sweetness, though they'll brown faster. The heavy cream is non-negotiable for gravy texture—half-and-half won't provide the same luxurious finish. If you're avoiding wine, a splash of soy sauce adds depth without alcohol, though the flavor profile shifts slightly.
Store raw liver and onions separately in airtight containers for up to 2 days in the fridge. The cooked dish reheats beautifully—gentle warming on the stovetop with a splash of stock preserves the gravy's texture. For meal prep, portion into glass containers and reheat covered to maintain moisture. The gravy can be made ahead and reheated separately, then combined just before serving. Leftovers keep for 3 days in the fridge or 2 months frozen, though the crispy onion topping may soften slightly upon reheating.
Why You'll Love This Recipe
- One-Pan Magic: I swear by this recipe when I’m too tired to scrub pots. Just toss sliced liver and onions in a baking dish, dot with butter, and let the oven do the work—no flipping, no fussing, just golden perfection when it’s done.
- Rich Umami Bomb: That caramelized onion butter sauce? It’s where this dish gets its soul. The beef stock reduces into a velvety gravy that clings to every bite, turning simple liver into something deeply satisfying—like a hug in sauce form.
- Leftovers That Shine: Between us, this recipe’s leftovers are better the next day. The flavors meld even deeper, and reheating with a splash of stock turns it into a quick, hearty lunch—no one will guess it’s liver (unless you tell them).
- Budget Powerhouse: Liver’s one of those ingredients that feels fancy but costs next to nothing. A single pound stretches across two meals, and the onions/flour/stock are pantry staples. Honestly, it’s the kind of recipe that makes me feel like I’m feeding a crowd without breaking the bank.
Step-by-step instructions for baked liver and onions with gravy
This method delivers a perfectly crispy liver crust with tender onions and a velvety gravy every time.
Prepare the Liver and Onions for Layering
Preheat your oven to 425°F to ensure maximum crispiness. Pat the 1 lb calves' liver completely dry with paper towels—this is critical for achieving that golden crust. Trim away any connective tissue and slice the liver into ¼-inch thick pieces, keeping them uniform for even cooking.
Thinly slice the 2 large yellow onions into ⅛-inch rounds, ensuring even layers. The onions should be translucent with no white centers remaining. Arrange half of the sliced onions in a single layer on the bottom of a 9x13-inch baking dish, slightly overlapping them. This creates the foundation for your flavor base.
Layer Butter and Seasonings for Maximum Flavor
Spread 3 tbsp of the cold unsalted butter evenly over the onions, cutting it into small pats for even distribution. Sprinkle half of the 1 tsp diamond crystal kosher salt and 0.5 tsp freshly ground black pepper evenly across the onions, pressing gently to adhere. Add half of the 1 tbsp fresh thyme leaves, distributing them evenly for balanced seasoning.
Place the liver slices in a single layer over the onions, slightly overlapping if needed. Top with the remaining onions, then spread the remaining 3 tbsp cold unsalted butter evenly over the top layer. The butter will melt and create a protective seal that locks in moisture while promoting crispiness. Sprinkle the remaining salt, pepper, and thyme over the top layer.
Bake Until Crispy and Cooked Through
Bake uncovered for 25-30 minutes until the top is deep golden brown and the liver releases easily from the baking dish. The edges should be crispy while maintaining a tender interior. If the top isn't browning sufficiently after 20 minutes, increase the oven temperature to 450°F for the final 5-10 minutes to achieve that perfect crust.
Check for doneness by inserting a knife into the thickest piece of liver—it should be just cooked through with a slightly pink center. Remove from the oven and let rest for 5 minutes before serving. This resting period allows the juices to redistribute, ensuring each bite remains moist and flavorful.
Create the Rich Pan Sauce
While the liver rests, place the baking dish on the stovetop over medium heat. Add the 0.25 cup dry red wine and scrape up all the browned bits from the bottom of the dish using a wooden spoon—these contain concentrated flavor. Let the wine simmer for 2-3 minutes until reduced by half.
Sprinkle the 2 tbsp all-purpose flour evenly over the wine mixture, whisking constantly to prevent lumps from forming. Gradually pour in the 1 cup beef stock while whisking continuously to create a smooth sauce. Add the 0.25 cup heavy cream and 1 tsp balsamic vinegar, then let the sauce simmer for 5-7 minutes until it thickens enough to coat the back of a spoon.
Finish with Fresh Herbs and Serve
Remove the liver and onions from the baking dish and arrange them on a serving platter. Strain the sauce through a fine-mesh sieve to remove any impurities, then pour it over the liver. Garnish with the 2 tbsp chopped fresh parsley just before serving to add a bright, fresh contrast to the rich flavors.
The crispy top should give way to tender liver with perfectly caramelized onions beneath. Each bite should deliver a balance of rich, savory flavors complemented by the velvety gravy. Serve immediately with crusty bread or roasted potatoes to soak up every last drop of that luxurious sauce.
Pro Tips For Making Baked Liver And Onions With Gravy
- Trim Liver Thin: Cut each slice no thicker than ¼-inch—any thicker and the center stays undercooked while the edges dry out. I learned this the hard way after serving a batch where the middle was still pink. A sharp knife and steady hand make all the difference here.
- Sweat Onions Low: Cook onions over medium-low heat until they’re translucent and just starting to caramelize—about 10-12 minutes. High heat turns them bitter fast, and you want that sweet, jammy texture to balance the liver’s richness. Skip the rush; patience pays off.
- Don’t Overcrowd the Pan: When browning the liver, work in batches if needed—overcrowding steams instead of sears, leaving you with gray, soggy edges. A hot pan and a little space guarantee that crisp, golden crust that soaks up the gravy like a sponge.
- Deglaze Immediately: As soon as you remove the liver, pour in the beef stock and scrape every last bit of fond from the pan. That browned goodness is pure flavor, and letting it sit turns it into a gummy mess. A wooden spoon works best—no lazy scraping here.
Common mistakes when making perfect results
Overcooking the Liver
Liver cooks faster than most meats, and once it hits 165°F internal temperature, it continues cooking from residual heat. I’ve seen this happen when baking at 425°F—the liver can go from perfect to dry in just 5 extra minutes.
Use an instant-read thermometer to check the thickest piece. The ideal doneness is 155-160°F—slightly pink in the center. If you’re unsure, pull it out 2-3 minutes early and let it rest. 🌡️
Skipping the Resting Time
This is a rookie mistake that turns tender liver into a chewy mess. After baking, liver needs 5-10 minutes to redistribute its juices. I’ve rushed this step and ended up with dry, stringy slices.
Place the baking dish on a wire rack to allow air circulation, which helps the crust stay crisp while the interior rests. Trust the process—patience here makes all the difference. ⏰
Uneven Onion Caramelization
Thinly sliced onions should caramelize evenly, but I’ve seen them turn mushy or stay pale when layers aren’t uniform. Arrange the onions in a single, even layer—no overlapping more than ⅛ inch.
If the top layer isn’t browning, increase the oven temperature to 450°F for the last 5-10 minutes. Avoid covering the dish, which traps steam and steams the onions instead of caramelizing them. 🍳
Using Low-Quality Butter
I’ve made this recipe with standard supermarket butter, and while it works, the flavor falls flat compared to European-style unsalted butter like Plugrá or Kerrygold. The higher fat content and cleaner taste make a noticeable difference in the gravy’s richness.
If you’re using salted butter, omit the added salt in the seasoning—too much can make the dish taste flat. Every layer of flavor matters here. 🧈
Rushing the Gravy Reduction
The gravy’s depth comes from reducing the wine and stock slowly over medium heat. I’ve seen people crank the heat to save time, but this leads to a thin, gloopy sauce instead of a velvety finish.
Let the wine reduce by half before adding the flour, and simmer the gravy for 5-7 minutes to thicken properly. If it’s too thick, thin it with a splash of stock; if too thin, simmer longer. Patience here is key. 🍷
Overcrowding the Baking Dish
If you stack the liver slices too closely, they’ll steam instead of crisp up. Arrange them in a single layer with ¼-inch gaps between each piece. This allows the butter to melt evenly and the onions to caramelize without becoming soggy.
A 9x13-inch baking dish is perfect for this recipe—any smaller, and the layers won’t fit properly. 🥘
Nutrition facts
Frequently asked questions
Why does the recipe call for resting the liver after baking?
Resting the liver for 5-10 minutes after baking allows the juices to redistribute, preventing dry slices. When liver hits 155-160°F, it continues cooking from residual heat—skipping rest time turns it chewy. Place the dish on a wire rack to keep the crispy top intact while it rests.
Can I use chicken liver instead of calves' liver?
Yes, but expect a milder flavor and slightly different texture. Chicken liver is leaner and cooks faster (15-20 minutes at 425°F), so check for doneness at 145°F. The gravy method remains the same, but you may need 1 tbsp extra butter to compensate for the lower fat content.
What's the best way to reheat leftovers?
Gently warm the liver and onions in an oven-safe dish at 300°F for 10-12 minutes, covered with foil. For the gravy, reheat separately on the stovetop over low heat—never microwave, as it breaks the sauce's velvety texture. Add a splash of stock or water if needed to loosen.
Is there a vegetarian alternative for the gravy?
Replace the liver with mushrooms (cremini or portobello) and use vegetable stock instead of beef stock. The wine and balsamic vinegar will still create depth, though the umami profile will differ. For richness, add 1 tbsp nutritional yeast to the gravy while simmering.
How do I fix gravy that's too thin or too thick?
For thin gravy, whisk in 1 tsp cornstarch mixed with 1 tbsp cold water and simmer for 2 minutes. If too thick, thin with 1 tbsp stock or water while whisking. Always return to medium heat to blend properly—never add cold liquid to hot sauce directly.