Sauces & Condiments
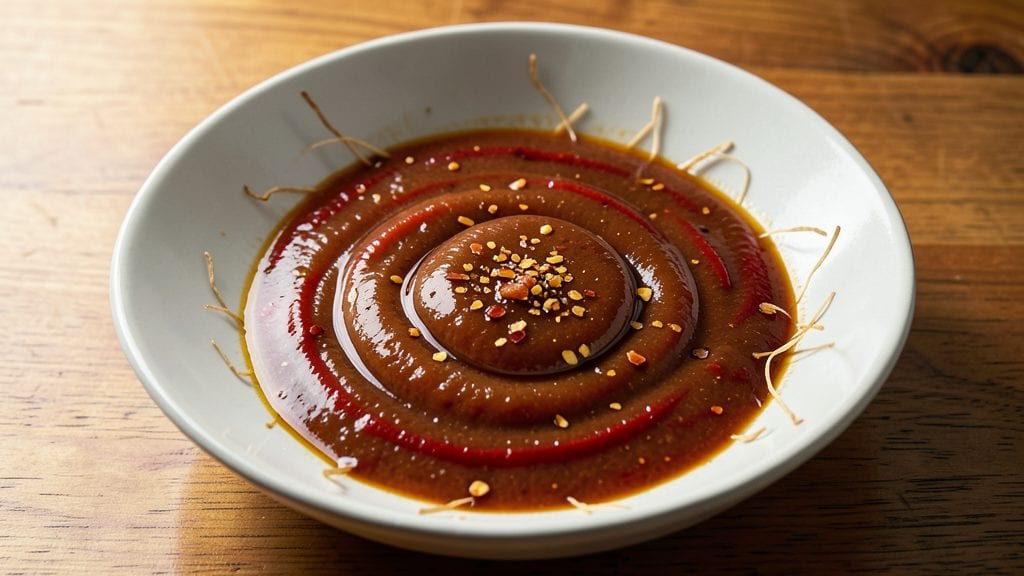
Grandma’s sweet chili sauce recipe transforms simple pantry staples into a versatile, tangy-sweet condiment that elevates everything from fried chicken to stir-fries. The secret lies in balancing heat, sweetness, and acidity—just like my grandmother did—using chili flakes, brown sugar, and vinegar for depth.
This sauce isn’t just a dip; it’s a flavor multiplier that adds complexity to marinades, glazes, or even cocktails.
The process is straightforward but requires patience: simmering the ingredients until thickened creates a glossy, sticky-sweet glaze with a subtle kick. Unlike store-bought versions, this recipe avoids artificial flavors, relying instead on natural caramelization from the sugar and chili.
A touch of tomato paste deepens the color and body, while cornstarch ensures the perfect consistency—neither watery nor cloying.
What you’ll end up with is a homemade sauce that’s richer, more balanced, and far more adaptable than anything in a bottle. The sweetness mellows the heat, while the vinegar keeps it bright, making it ideal for dipping spring rolls, basting grilled meats, or drizzling over noodles.
Best of all, it keeps for weeks in the fridge, so you’ll always have a jar ready for spontaneous cravings.
Ready to make this sauce? It’s simpler than you think—just a few ingredients and 15 minutes of active time. Let’s get started with the full recipe, including tips for adjusting the heat or sweetness to your taste.
Ingredients for grandma's sweet chili sauce
Nine pantry staples craft a sauce richer than store-bought versions.
| Ingredient | Amount | Notes |
|---|---|---|
| Chili Flakes 🌶️ | 2 tbsp | Adjustable for heat preference |
| Light Brown Sugar 🍯 | ½ cup | Packed for accurate measurement |
| Apple Cider Vinegar 🍏 | ¼ cup | For tangy brightness |
| Tomato Paste 🍅 | 1 tbsp | High-quality for depth |
| Cornstarch 🌾 | 1 tsp | Ensures proper thickening |
| Water 💧 | ½ cup | Adjust for desired consistency |
| Garlic Cloves 🧄 | 2 cloves | Minced for aromatic base |
| Extra-Virgin Olive Oil 🫒 | 1 tbsp | For glossy finish |
| Diamond Crystal Kosher Salt 🧂 | ½ tsp | Balances sweetness |
| Fresh Ginger 🌿 | 1 tsp | Grated for subtle warmth |
Chili flakes are the foundation of this sauce, so opt for high-quality, finely ground varieties—brands like Penzeys or McCormick offer consistent heat levels. Brown sugar should be packed into the measuring cup for accuracy, and light brown sugar provides the ideal caramel depth without overpowering. Apple cider vinegar adds brightness, but if you prefer a milder tang, white vinegar works equally well. For tomato paste, San Marzano or Muir Glen brands deliver superior flavor, though any quality paste will suffice. The cornstarch ensures a glossy, clingy finish—Bob’s Red Mill is a reliable choice for thickening agents.
No chili flakes? Cayenne pepper or crushed red pepper can substitute at half the amount, though texture will differ. Substituting brown sugar with white sugar reduces caramelization slightly, so add an extra 0.5 tsp of vinegar to compensate. If you lack tomato paste, pureed canned tomatoes work in a pinch, though the sauce will be less concentrated. For a smoother texture, blend the garlic and ginger with the water before adding to the pot. The olive oil isn’t just for flavor—it creates that signature glossy sheen, so use extra-virgin for richness.
This sauce thickens as it cools, so stir in an extra 0.5 tsp of cornstarch if it’s too thin after simmering. Store in an airtight container in the refrigerator for up to 3 weeks, though flavor intensifies over time. For longer storage, freeze in ice cube trays—perfect for single-use portions. The sauce reheats beautifully, making it ideal for last-minute drizzling over grilled meats or noodles.
Why You'll Love This Recipe
- Pantry Magic: I swear, this sauce comes together with stuff you already have. No fancy shopping—just chili flakes, brown sugar, and vinegar from that shelf you never look at.
- Sweet Heat Balance: That first taste of brown sugar caramelizing with chili flakes? It’s like a hug for your taste buds. The vinegar cuts through the sweetness just enough to make it dangerously addictive.
- Dip or Drizzle: Use it on fries, toss it with noodles, or slather it over grilled chicken—it’s my go-to for anything that needs a little sweet-spicy punch. (Yes, even on a Tuesday night.)
- Makes a Month’s Worth: A single batch stretches for weeks in the fridge, and it only costs pennies per serving. Freeze half if you’re not using it fast enough—I know I always do.
Step-by-step instructions for grandma's sweet chili sauce
This method delivers a perfectly balanced sauce with vibrant sweetness and subtle heat every time.
Bloom the Aromatics in Olive Oil
Heat the 1 tablespoon extra-virgin olive oil in a medium saucepan over medium heat. Add the 2 minced garlic cloves and 1 teaspoon grated fresh ginger, stirring constantly for 1-2 minutes until fragrant but not browned. The ginger should release its aromatic oils while the garlic maintains a pale golden color.
Watch the pan closely—ginger burns quickly, so keep the heat steady. You're building the flavor foundation here, so don't rush this step. Once you see the garlic dancing in the oil and smell that bright, citrusy aroma, you're ready for the next ingredients.
Develop the Sweet-Savory Base
Add the 1 tablespoon tomato paste and stir for 30 seconds to distribute evenly. Pour in the 0.25 cup apple cider vinegar and 0.5 cup water, then sprinkle in the 0.5 teaspoon diamond crystal kosher salt and 2 tablespoons chili flakes. Bring the mixture to a gentle simmer over medium heat.
Let it cook for 5 minutes until the vinegar's sharpness mellows and the tomato paste dissolves completely. You should see a glossy, slightly thickened liquid with tiny floating chili flakes. This is where the sauce's character begins to form—don't let it boil vigorously, or the vinegar will evaporate too quickly.
Build Body with Sugar and Thicken
Add the 0.5 cup packed light brown sugar and stir until completely dissolved, which should take about 1 minute. In a small bowl, whisk together the 1 teaspoon cornstarch with 2 tablespoons water to create a smooth slurry. Slowly pour this into the simmering sauce while stirring constantly.
Continue cooking for 3-4 minutes until the sauce thickens to a glossy, spoonable consistency. You'll know it's ready when it coats the back of a spoon and leaves a slight sheen. If it thickens too quickly, add 1 tablespoon water at a time until you reach the perfect texture—somewhere between a thick syrup and a light glaze.
Simmer to Perfect Balance
Reduce the heat to low and let the sauce simmer gently for 8-10 minutes, stirring occasionally. This final reduction allows the flavors to meld completely and the sweetness to develop properly. You're looking for a sauce that's glossy and smooth, with visible chili flakes suspended throughout.
The sauce should taste like a perfect harmony of sweet, tangy, and just a hint of heat. If it needs more balance, adjust with a pinch more salt or a teaspoon more sugar. For extra depth, you can add 1 teaspoon honey or 1 teaspoon soy sauce during this final simmering stage—though the recipe as written should already achieve that classic grandma-style equilibrium.
Pro Tips For Making Grandma'S Sweet Chili Sauce
- STIR CONSTANTLY AT FIRST: I learned this the hard way—when you add the tomato paste, the sauce can seize up and burn before it blends. Keep that pan moving for the first 3-4 minutes, even if it means your arm gets tired. Once the paste darkens slightly, you can ease up.
- SIFT THE CHILI FLAKES: Those little flakes pack like sand if you just dump them in. Lightly sift them over the sauce while stirring—this keeps the heat even and prevents clumping. (Yes, even if you’re impatient like me.)
- WHISK THE CORNSTARCH: Mixing cornstarch into cold water first is the obvious move, but don’t just stir it—whisk it vigorously until it’s completely smooth. Lumps in the sauce mean you’ll end up with a grainy, unappetizing texture. A few extra seconds here saves you from scraping the pot later.
- TASTE BEFORE YOU THICKEN: Add the vinegar and sugar first, then taste the sauce before tossing in the cornstarch slurry. You might need more acid or sweetness—adjusting now is easier than trying to fix a gluey mess later. (And no, the recipe’s measurements aren’t always perfect.)
Make-ahead tips for this recipe
Batch Prep Basics
This sauce makes about 1.5 cups, perfect for a family of four or meal prep. I always double the recipe when making ahead—just multiply all ingredients by 2. Use a heavy-bottomed saucepan (I love my All-Clad) to prevent scorching during simmering.
The sauce thickens as it cools, so stop simmering when it reaches a glossy syrup consistency—it will thicken further in the fridge. 💡
Fridge Storage Secrets
Transfer the cooled sauce to an airtight container (I prefer Le Parfait glass jars) and store in the fridge for up to 3 weeks. The flavors actually improve over time, developing deeper caramel notes.
To use, simply reheat in a small saucepan over low heat, stirring occasionally until warmed through. For extra shine, add 1 teaspoon water per cup of sauce before reheating. ❄️
Freezer-Friendly Tips
For longer storage, freeze the sauce in ice cube trays—each cube equals about 1 tablespoon, perfect for single-use portions. Once frozen, transfer cubes to a freezer bag and flatten to save space.
Thaw overnight in the fridge or microwave for 30 seconds on 50% power. The texture remains perfect for drizzling or dipping, though it may separate slightly—just stir before using. 🧊
Reheating Perfection
For best results, reheat in small batches to avoid overheating. I use a small saucepan on low heat, stirring constantly until the sauce reaches 160°F—just hot enough to kill any bacteria while preserving texture.
If the sauce thickens too much during reheating, thin with 1 teaspoon water at a time. Never microwave directly from the fridge, as this can create a grainy texture. 🔥
Sauce Starter Kit
Prepare a mini batch (half the recipe) to keep in your fridge at all times. Store it in a small mason jar in your pantry for quick access. This ensures you always have sauce on hand for last-minute stir-fries, grilled meats, or dipping spring rolls.
The small batch also lets you experiment with flavor adjustments without committing to a full batch. 🌶️
Gift-Worthy Jars
Package the sauce in small glass jars (like Ball canning jars) for thoughtful gifts. Label with the recipe name and date, then tie a kitchen twine around the lid.
These make perfect hostess gifts or holiday presents—everyone loves homemade condiments! The sauce keeps well for 2 weeks at room temperature in a cool, dark place. 🎁
Nutrition facts
Frequently asked questions
Can I adjust the heat level in this sauce?
For a milder sauce, reduce chili flakes to 1 tablespoon or swap them for ½ teaspoon cayenne pepper. For extra heat, add ½ teaspoon more chili flakes or a pinch of crushed red pepper flakes at the end. Taste as you go—this sauce forgives easy adjustments!
What’s the best way to use leftover sweet chili sauce?
This versatile sauce works as a glaze for grilled meats, a marinade for tofu or chicken, or a dip for spring rolls and fries. For extra creativity, drizzle it over noodles, mix into peanut sauce for satay, or even use it as a cocktail glaze (try it with bourbon or rum!). Store leftovers in an airtight container for up to 3 weeks.
Why did my sauce turn out too thin?
If your sauce is too thin, it likely didn’t simmer long enough or the cornstarch didn’t activate fully. Next time, let it reduce longer on low heat or whisk in an extra ½ teaspoon cornstarch with 1 tablespoon water to thicken. Avoid boiling—gentle simmering is key for the perfect consistency.
Can I make this sauce without cornstarch?
Yes, but the texture will be thinner. For a cornstarch-free version, simmer the sauce longer (15-20 minutes) to reduce naturally, or use 1 tablespoon tomato paste as a thickener instead. The sauce will still taste great, though it may lack the glossy finish. Adjust sweetness with extra sugar if needed.
How do I store this sauce for longer shelf life?
For best results, store in an airtight glass jar in the fridge for up to 3 weeks. For longer storage, freeze in ice cube trays (thaw as needed) or small portions in freezer bags. Reheat gently on low heat or microwave for 30 seconds—never microwave directly from the fridge to avoid graininess.