
Sauces & Condiments
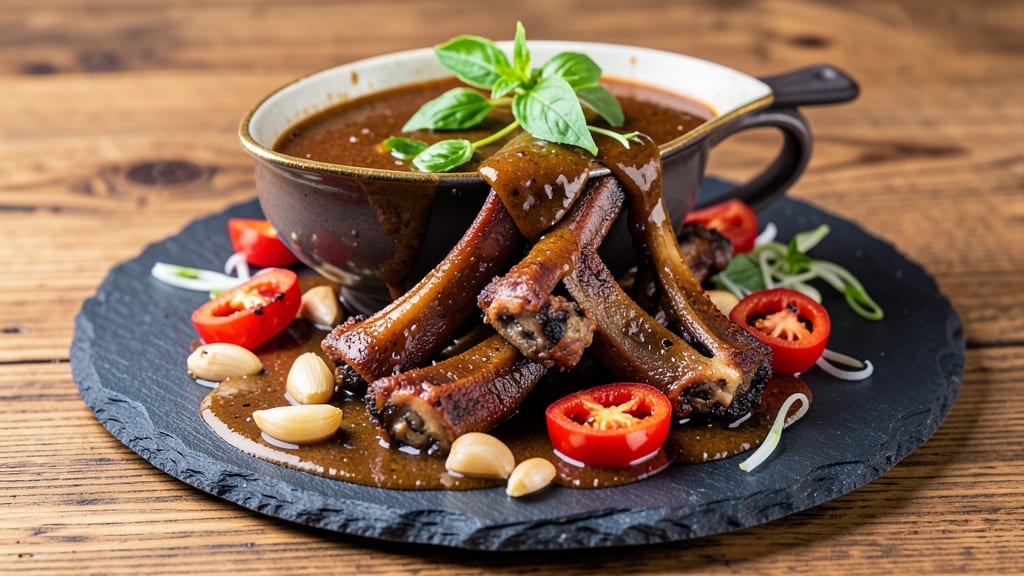
This oxtail sauce recipe transforms humble braising liquid into a velvety, umami-rich masterpiece that elevates any dish it touches. The secret lies in slow simmering oxtail bones with aromatics until the collagen dissolves into a deep, caramelized broth—then reducing it into a glossy, velvety sauce with just the right body.
I developed this version after years of refining restaurant-style techniques at home, where the difference between good and extraordinary sauce often comes down to patience and precision.
The foundation of great oxtail sauce begins with slow cooking—at least 4 hours—to extract maximum flavor from the bones, then building depth with soy sauce, star anise, and a touch of brown sugar.
A simple cornstarch slurry thickens it just enough to cling beautifully to rice, noodles, or braised meats without ever feeling heavy. The result is a sauce that's rich yet balanced, with layers of savory, slightly sweet complexity that makes every bite memorable.
What makes this sauce truly versatile is how it transforms ordinary meals into something special. Drizzle it over steamed jasmine rice for an instant upgrade, toss it with egg noodles for a restaurant-worthy stir-fry, or use it as a glaze for grilled meats.
The sauce keeps well in the refrigerator for up to 5 days, so you can make a big batch and use it throughout the week—proof that homemade always tastes better than store-bought.
For those who love umami depth, this sauce delivers restaurant-quality results with minimal effort after the initial cooking time. The key is letting flavors meld slowly, then finishing with a bright splash of rice vinegar to cut through the richness.
Whether you're serving it as a side or making it the star of the plate, this sauce is a game-changer for anyone who appreciates bold, well-seasoned flavors.
Ingredients for oxtail sauce
Eleven simple ingredients unlock restaurant-style oxtail sauce depth at home.
| Ingredient | Amount | Notes |
|---|---|---|
| Oxtail Bones 🦬 | 2 lb | Cut into 2-inch pieces, trimmed |
| Yellow Onion 🧅 | 1 whole | Chopped, medium size preferred |
| Garlic Cloves 🧄 | 6 cloves | Peeled, smashed for aroma |
| Fresh Ginger 🌿 | ½ cup | Finely grated, skin removed |
| Star Anise 🌟 | 2 whole | Lightly crushed for flavor |
| Cinnamon Sticks 🌿 | 2 whole | 2-inch lengths preferred |
| Light Soy Sauce 🍶 | ½ cup | Kikkoman preferred for balance |
| Brown Sugar 🍚 | ¼ cup | Packed, light brown preferred |
| Rice Vinegar 🍶 | ¼ cup | Seasoned preferred for depth |
| Cornstarch 🌾 | 2 tbsp | For smooth thickening |
| Water 💧 | 4 cups | Filtered preferred for clarity |
The oxtail bones are non-negotiable—look for marrow-rich cuts at specialty butchers or the meat section of Whole Foods or Costco. Trim any excess fat to avoid cloudiness in the sauce. Star anise and cinnamon are available in the spice aisle, but I always grab mine from Penzeys for maximum potency. Fresh ginger should be firm and aromatic—skip any with soft spots or sprouting. The soy sauce matters too: Kikkoman or Pearl River Bridge give that authentic umami without overpowering. For brown sugar, light brown works best—it dissolves cleaner than dark.
No star anise? 1 tsp ground anise seed works in a pinch, but the flavor is subtly different. Running out of cinnamon sticks? 1/2 tsp ground cinnamon is fine, though the texture won't be as elegant. Fresh ginger too pungent? 1/4 cup ginger paste (like Annie's brand) keeps the moisture without the bite. The cornstarch slurry is critical—mix it with cold water before adding to the hot sauce to avoid clumping. For extra depth, add 1 tbsp fish sauce if you're feeling adventurous.
This sauce tastes even better the next day as flavors meld. Store in an airtight container in the fridge for up to 5 days, or freeze for 3 months. I portion mine into ice cube trays—perfect for single-use applications. The sauce thickens as it cools, so reheat gently and thin with a splash of water if needed. Leftovers make an amazing glaze for seared pork chops or a drizzle over ramen.
Why You'll Love This Recipe
- One-Pot Magic: I swear by this—just toss the oxtail bones, onions, and ginger into a single pot, cover with water, and let it simmer. No chopping mountains of veggies, no fussing with multiple pans. The star anise and garlic infuse everything as you go, so you’re basically hands-off until the rich, caramelized sauce is ready.
- Deep Umami Bomb: That first bite? Pure flavor payoff. The oxtail melts into the sauce, leaving behind a velvety, bone-broth richness while the ginger and star anise add a warm, aromatic depth. It’s the kind of taste that makes you slow down mid-bite—no light, forgettable flavors here.
- Leftovers That Beg for More: Between us, this sauce improves the next day. The flavors meld into something even richer, and it’s perfect for slathering on rice, noodles, or even dipping spring rolls. I’ve reheated mine three times, and my family still asks, “Why isn’t this on the table every week?”
- Budget-Friendly Luxury: Oxtail bones are cheaper than you’d think, and they stretch into so much sauce—enough to feed four for dinner and still have leftovers. Plus, the onions and ginger are pantry staples, so you’re not breaking the bank for a restaurant-worthy dish. It’s comfort food that doesn’t guilt-trip your wallet.
Step-by-step instructions for slow-simmered oxtail sauce
This is where the magic happens—where rich, caramelized flavors develop over time.
Sear the Oxtail Bones for Deep Flavor
Heat a large Dutch oven over medium-high heat until it's screaming hot. Working in batches if needed, sear the 2 lb oxtail bones until they develop a deep mahogany crust on all sides—about 5-7 minutes per batch. This step is non-negotiable; the Maillard reaction creates the sauce's foundational depth.
As you sear, resist the urge to crowd the pan. Give each piece space to crisp without steaming. Once all bones are golden and aromatic, remove them and set aside. You'll notice the bottom of your pot now carries a beautiful, sticky residue—this is pure umami waiting to dissolve into your sauce.
Build the Aromatic Base with Onion and Ginger
In the same Dutch oven, add the 1 whole chopped yellow onion and 0.5 cup finely grated fresh ginger. Cook over medium heat for 8-10 minutes, stirring occasionally, until the onions soften and the ginger releases its bright, pungent aroma. You'll see the mixture collapse and darken slightly—this indicates proper caramelization.
Here's where we add the spices: toss in the 6 smashed garlic cloves, 2 lightly crushed star anise, and 2 cinnamon sticks. Stir for 1-2 minutes until the garlic becomes fragrant and the spices begin to toast. Be careful not to let the garlic burn—it should smell sweet and nutty, not bitter. This aromatic trio forms the soul of your sauce.
Deglaze and Simmer the Foundation
Pour in the 4 cups water and scrape up every last bit of those flavorful browned bits from the bottom of the pot. Add the 0.5 cup light soy sauce and 0.25 cup brown sugar, then return all the seared oxtail bones to the pot. Bring everything to a gentle boil over high heat, then immediately reduce to a low simmer. This is where patience becomes your ally.
Partially cover the pot and let it simmer for 2 hours, stirring occasionally. You'll notice the liquid gradually reduces and the bones soften. The sauce should develop a rich, caramelized color and an irresistible aroma that fills your kitchen. If the liquid reduces too quickly, add ½ cup water to maintain the simmer—just enough to keep the bones submerged.
Finish with Vinegar and Thicken the Sauce
After 2 hours, remove the oxtail bones and set them aside (they'll be incredibly tender). Increase the heat to medium and stir in the 0.25 cup rice vinegar. This brightens the sauce and balances the richness. Let it simmer for 5-7 minutes until the vinegar aroma dissipates and the sauce thickens slightly.
In a small bowl, whisk together the 2 tbsp cornstarch with 2 tablespoons of the sauce to create a slurry. Slowly pour this back into the pot while stirring constantly. The sauce will thicken dramatically—you're aiming for a glossy, velvety consistency that coats the back of a spoon. If it's too thick, add 1-2 tablespoons water to reach your desired texture.
Strain and Serve with Confidence
Line a fine-mesh strainer with cheesecloth or a coffee filter if you want an ultra-smooth sauce. Pour the sauce through the strainer, pressing gently on the solids to extract every last drop of flavor. Discard the solids (or save them for broth). Taste and adjust seasoning—you might need a touch more soy sauce for saltiness or vinegar for brightness.
Return the strained sauce to the pot and keep it warm over low heat. Serve immediately over the tender oxtail bones, or use it as a luscious glaze for braised meats, noodles, or even as a dipping sauce. This sauce keeps beautifully in the refrigerator for up to 5 days or can be frozen for 3 months—though I doubt it'll last that long in your kitchen.
Pro Tips For Making Oxtail Sauce
- BLADE THE OXTAL TAILS: Use a sharp knife to slice through the oxtail bones just below the knuckle—this is where the collagen-rich marrow hides. I learned this the hard way after cutting into tough, meatless bone; the sweetest sauce comes from the first few inches of tail, not the hard ends.
- SWEAT THE ONIONS LOW: Cook the yellow onions in batches over medium-low heat for 15-20 minutes until they’re deep golden, not brown. Rushing this step burns the sugar and turns your sauce bitter—like charring garlic, but worse because you can’t just toss it out.
- STAR ANISE FIRST: Toss a whole star anise into the pot before adding the oxtails—it blooms its aniseed flavor into the fat, infusing the sauce from the start. Skip this, and you’re left with a faint afternote instead of a warm, aromatic backbone.
- SKIM THE FOAM OFF: After the oxtails hit the pot, a thick foam rises from the rendered fat and impurities. Letting it sit turns your sauce cloudy—just skim it off with a spoon for the first 5 minutes. Yes, it’s tedious, but your sauce will look (and taste) like it belongs in a restaurant.
Essential equipment for this dish
Dutch Oven Essentials
A heavy-duty Dutch oven is the cornerstone of oxtail sauce—it distributes heat evenly and handles the long simmer without hot spots. I swear by a Lodge 5.5-quart cast iron Dutch oven for its unmatched heat retention and durability.
For budget-friendly options, All-Clad Stainless Steel or Le Creuset Enameled Cast Iron both work beautifully. The deep sides prevent spills while simmering, and the tight-fitting lid traps steam for consistent collagen extraction. 🔥
Fine-Mesh Strainer
Straining your sauce is where you separate it from the good stuff—those flavorful solids packed with collagen and caramelized bits. A fine-mesh strainer (like the OXO Good Grips) is a must, but for ultra-smooth results, line it with cheesecloth or a coffee filter.
This ensures your sauce is silky and free of any unwanted texture. I’ve tried mesh strainers with larger holes, and they leave behind precious bits of flavor. Press the solids gently to extract every last drop of umami goodness.
Immersion Circulator
While not strictly necessary, an immersion circulator (like the Anova Nano or Breville Joule) can elevate your sauce game by maintaining a precise temperature during the long simmer. Set it to 185°F—just below a simmer—to extract collagen without overcooking the aromatics.
This tool is a game-changer if you’re short on time or want to multitask. For those without one, a candy thermometer (like Thermoworks Thermapen) clamped to the pot ensures you stay in the 180-190°F sweet spot for collagen breakdown. 🌡️
Wooden Spoon & Slotted Spoon
A wooden spoon (like OXO Good Grips) is indispensable for stirring the sauce without scratching your Dutch oven. Wood conducts heat poorly, so it won’t burn your sauce even during long simmers.
For removing the oxtail bones, a slotted spoon (preferably stainless steel) makes the job easier—just slide it under the bones to lift them out without losing broth. I keep both within arm’s reach while cooking to avoid interruptions.
Whisk for Slurry
The cornstarch slurry is what transforms your sauce from a thin broth into a velvety glaze. A balloon whisk (like Macalla) is perfect for mixing the 2 tbsp cornstarch with 2 tbsp sauce into a smooth, lump-free slurry.
Whisking also helps incorporate the slurry evenly into the hot sauce, preventing clumps. For extra smoothness, strain the slurry through a fine-mesh sieve before adding it to the pot. A whisk’s flexibility ensures you get every last bit of cornstarch dissolved. 💫
Measuring Tools
Precision matters when balancing flavors in oxtail sauce. A stainless steel measuring cup set (like OXO Stainless Steel) ensures accurate measurements for soy sauce, vinegar, and brown sugar—critical for achieving the right balance of sweet, salty, and tangy.
For spices like star anise and cinnamon, a spice grinder (like Spiceworks) helps you crush them evenly without overdoing it. I also keep a digital kitchen scale handy for weighing brown sugar if I’m feeling particularly precise—it makes a noticeable difference in consistency.
Nutrition facts
Frequently asked questions
Can I make this sauce without oxtail bones?
The bones are essential for collagen-rich depth, but you can substitute 2 lb beef marrow bones or pork femur bones for similar results. If you must skip bones entirely, use 4 cups high-quality beef broth and add 1 tbsp fish sauce for umami. The texture will be lighter, but still flavorful.
How do I adjust the thickness of the finished sauce?
If your sauce is too thick after straining, thin it with 1-2 tablespoons warm water at a time until it reaches a glossy, spoon-coating consistency. For extra body, simmer uncovered for 5-10 minutes to reduce it further. The ideal texture should cling lightly to rice or noodles without being gluey.
What's the best way to store leftovers?
Transfer the cooled sauce to an airtight container and refrigerate for up to 5 days. For longer storage, freeze in ice cube trays (perfect for single-use portions) or a sealed container for 3 months. Reheat gently over low heat, stirring constantly to prevent skin formation. A splash of water may be needed to restore original consistency.
Can I make this sauce in an Instant Pot?
Yes! Sear the bones first in a skillet, then transfer to the Instant Pot with all ingredients except cornstarch. Cook on high pressure for 60 minutes, then release pressure naturally. Strain and thicken with cornstarch slurry as directed. The Instant Pot version takes 45 minutes total but may lack some of the deep caramelization from slow simmering.
Why does my sauce taste bitter?
Bitterness usually comes from overcooked garlic or spices. For next time, remove the 2 cinnamon sticks and 1 star anise after 15 minutes of simmering. Also check your soy sauce—some brands are saltier than others. If already made, balance the bitterness with 1 teaspoon honey or ½ teaspoon sugar per cup of sauce, then simmer for 5 minutes to integrate.